MusicStreamer UserGuide

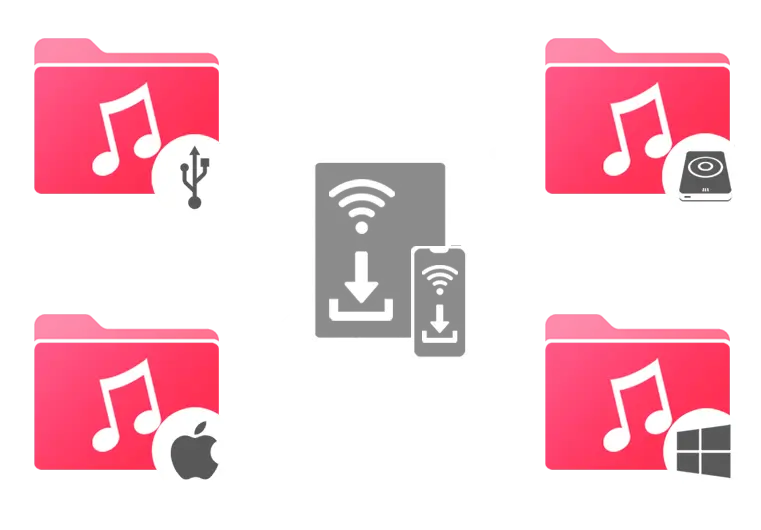
Connect to your Music Collection
Connect to your music library wirelessly on your Mac, PC, Network Media Drive, and TimeCapsule. You can even plug in a USB with Music on it.
If you need help setting the app up, click one of the links below.
- Tap the "Cog" icon
- Then select "Music Sources"
- Tap "Add Music Source"
- And follow the setup wizard.
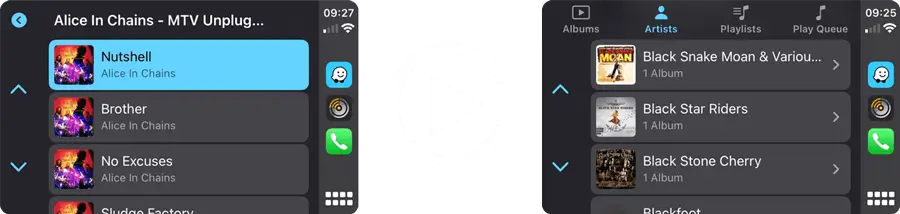
View Modes
Switch between Artist, Album and Song views. When in Album view you can switch between List or Grid Mode.
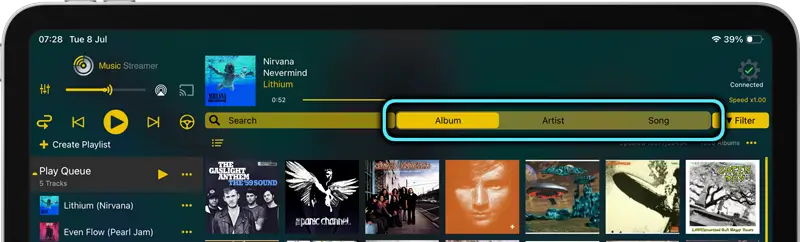
Note: You can change your album view mode to group by artist or by album title. Under "Preferences > Sort Albums by Artist Name".
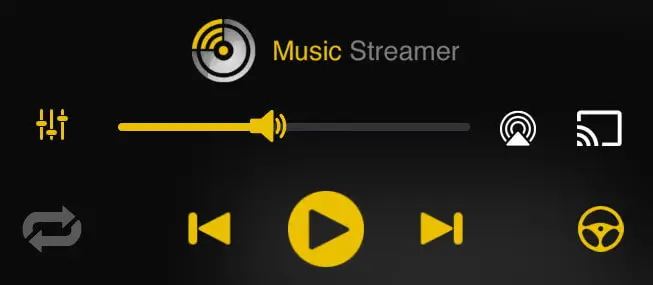
Play Modes

Standard
Play the Play Queue.
Repeat
Repeat the entire Play Queue.
Repeat Track
Repeat the current track.
Endless Play
A random Song is added to the end of the Play Queue after the current track has finished.
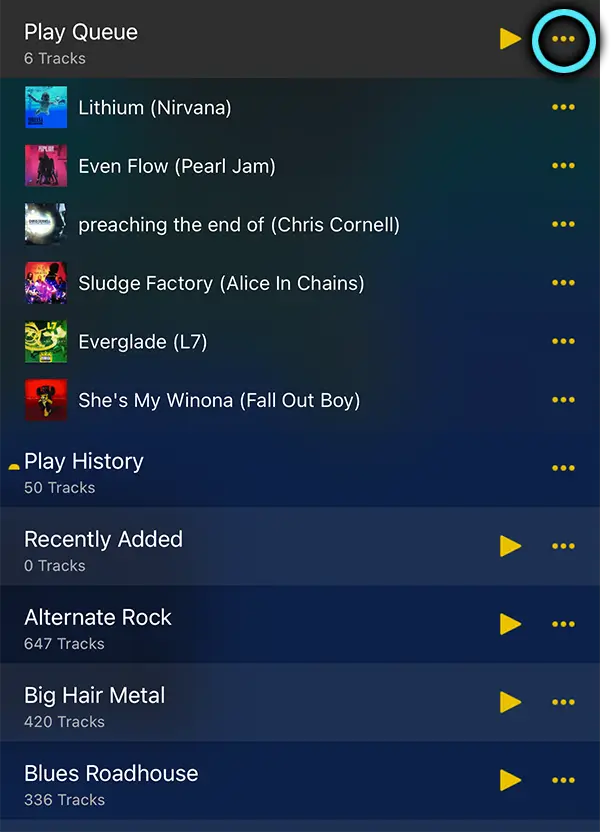
Play Queue
Play Now
Tapping "Play Now" on a Song will add that song to the top of your current Play Queue and begin to play it immediately. Doing this for an Album or Playlist will add all songs of that album/playlist to the top of the Play Queue.
Play Next
Tapping "Play Next" on a track will insert it into the play queue after the current track.
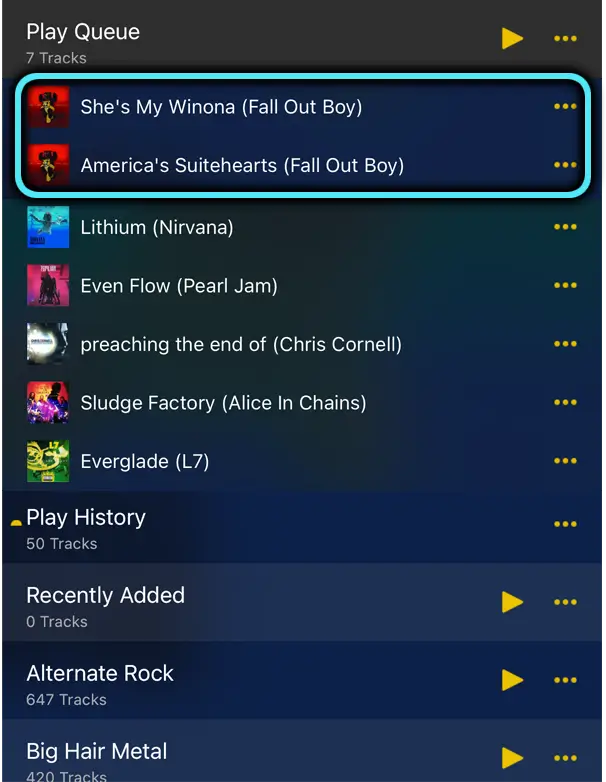
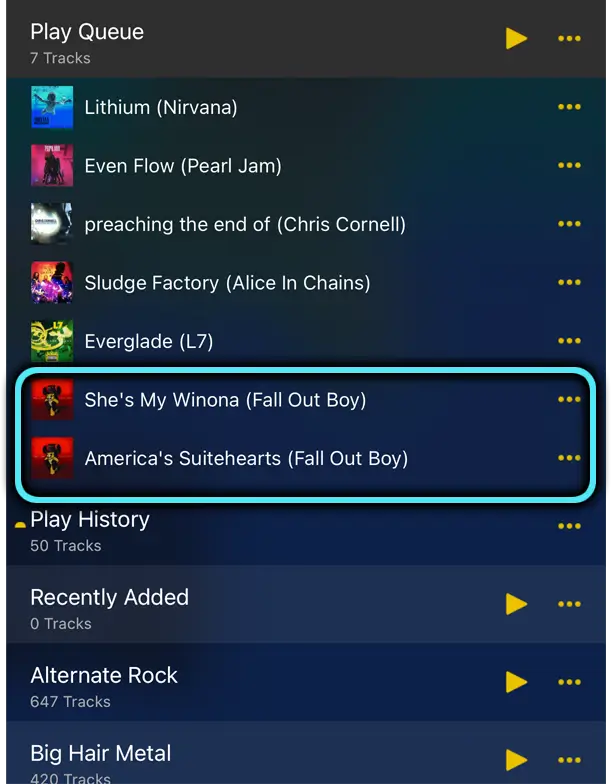
Queue Up
Tapping "Queue Up" will insert the tracks at the bottom of the Play Queue.
Queue From Here
Queues the tracks from an Album from the selected Song onwards.
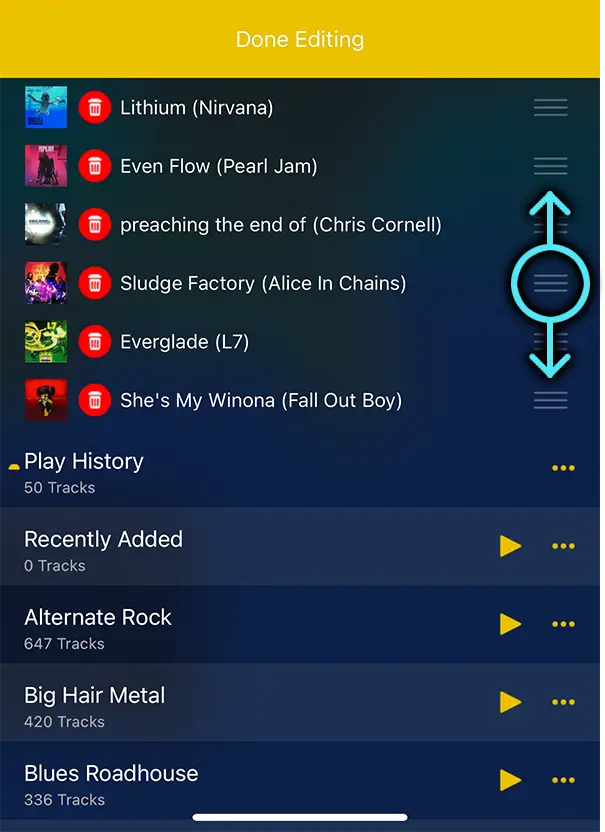
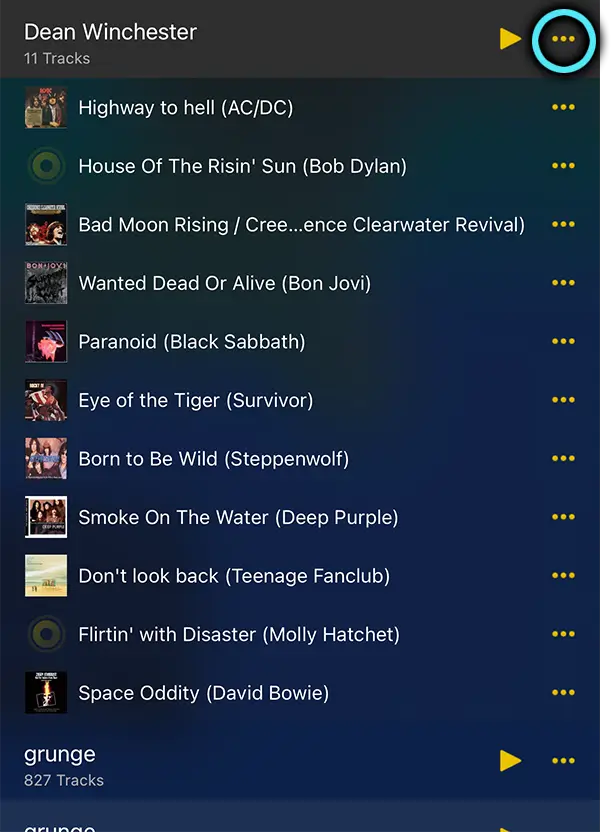
Edit / Re-Order Play Queue
You can swipe right to left on a track to delete it from your play queue.
To enter edit mode, tap the Play Queue action menu and select 'Edit' to re-order the Play Queue without changing the original Album or Playlist.
Play History
Your Play History shows the last 50 tracks played.
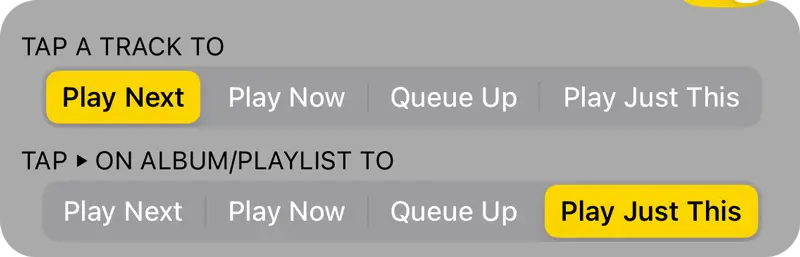
Music Playing Prefences
Change what happens when you tap an Album/Playlist or a Song. Tap the Cog icon and select "Preferences" then scroll down and change the options for "Tap a Track to" and "Tap an Album/Playlist to" one of the options below:
Play Next
Add the selection to the Play Queue to play after the currently playing Track.
Play Now
Play the selection immediately, pushing the current track and others down in the Play Queue.
Queue Up
Tracks will be added to the end of the Play Queue allowing you to build a sequence for playback later or save the Play Queue to a new Playlist.
Play Just This
Clear all Tracks and play this selection.
Note: This is the Default mode and we recommend starting with this until you get used to the Play Queue.
Playlists
Create a Playlist
Tap the 'Create Playlist' button under the play controls and name it.
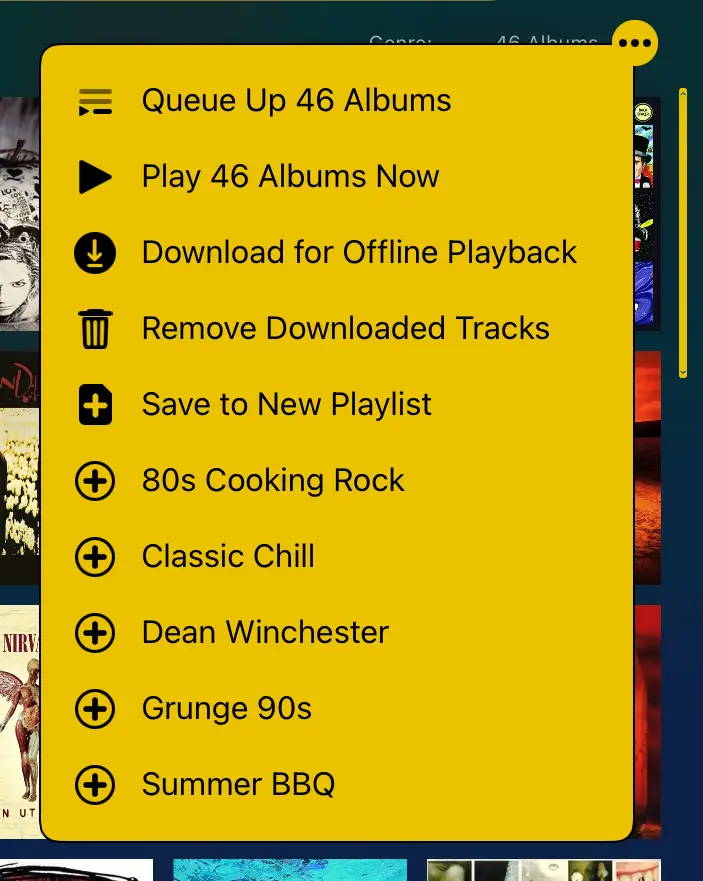
Add Tracks to a Playlist
Add an Album, all Albums for an Artist or individual Songs to a Playlist by tapping the action menu icon and choosing the Playlist you wish to add them to, or create a new Playlist.
Edit a Playlist
Tap the Playlist action menu icon and choose 'Edit'. Now you can:
- Re-order your Songs by using the drag controls.
- Remove unwanted Songs by tapping the delete icon.
Once you have finished editing your Playlist, tap 'Done Editing'.

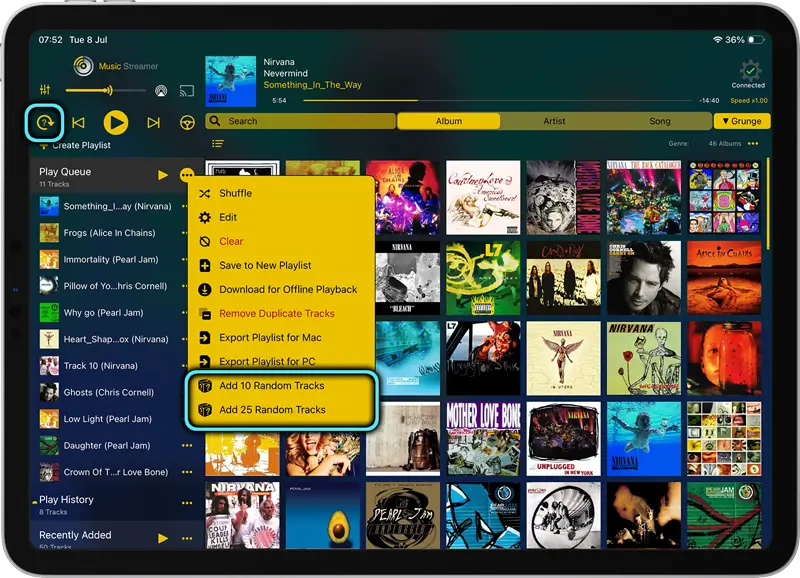
Add Random Tracks
Use the Play Queue or Playlist menu to add 10 or 25 random tracks, chosen automatically from the set of albums listed in the right-hand panel. Control which albums are eligible by using the Search keywords or Genre selector.
You can also change the playback mode to Endless to add random tracks, see section below.
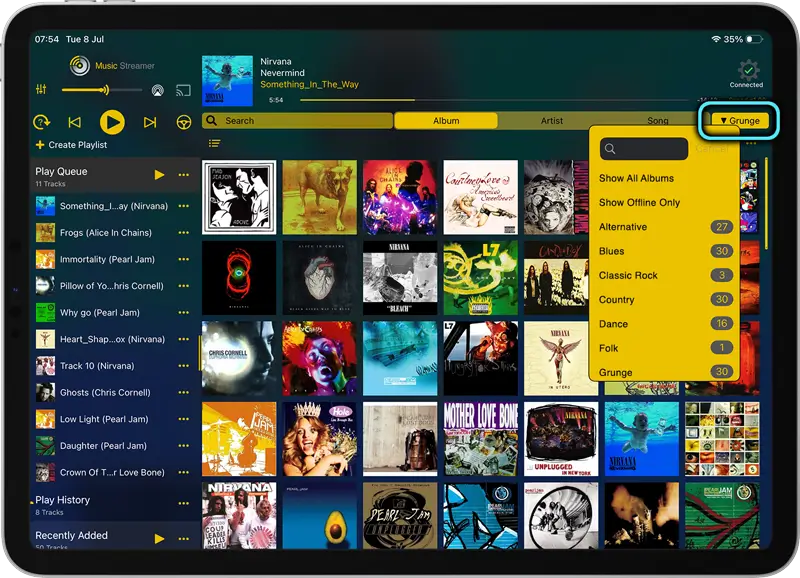
Filter by Genre
Tap the Filter dropdown to filter your Music to Blues, Rock, Classical or Grunge music. If you pull down on the list you can search for a genre. Just start typing in the box.
On the iPhone tap the search icon. This will reveal the Filter options.
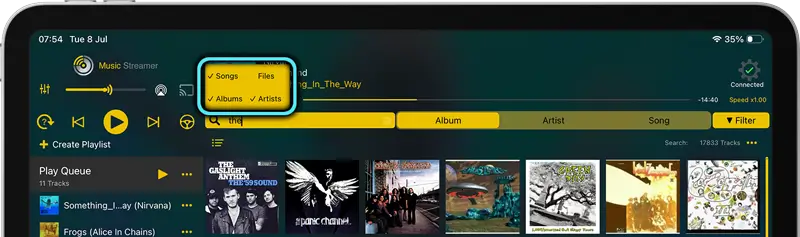
Search
Search by Song, Album, Artist or File name. Choose which of these options apply to your search by selecting the options just above the search input. In Album or Artist view modes, expand albums to see highlighted matching tracks.

Download Music for Offline Playback
Download your music for offline playback on your iOS devices. You can download Songs, Albums, Albums for an Artist, Playlists or even your music search results.
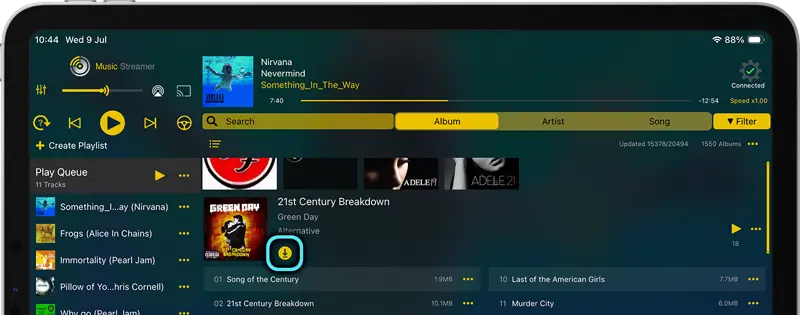
You can see if a track has been downloaded by the small dot next to the track name.Download An Entire Album
Tap an album to expand its contents and tap the Download icon.
You know when a track is available for offline playback as a small circle will appear to the left of the track number.
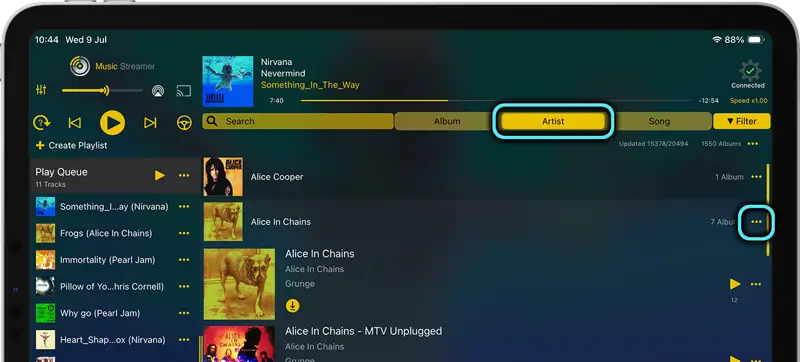
Download All Albums by an Artist
Download all albums by a particular artist. Select the Artist view, then tap on an artist to reveal their albums. Tap on the actions menu to the right of the artist name and select "Download for Offline Playback".
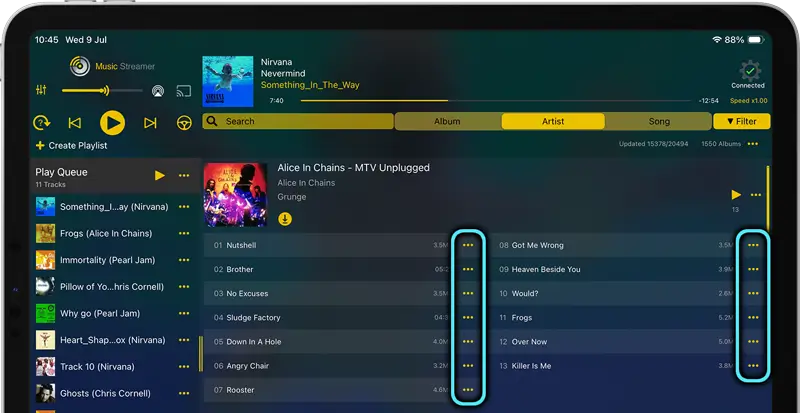
Download Individual Songs
Individual tracks can be downloaded from any of the Album, Artist or Song views by choosing "Download for Offline Playback" from the actions menu.
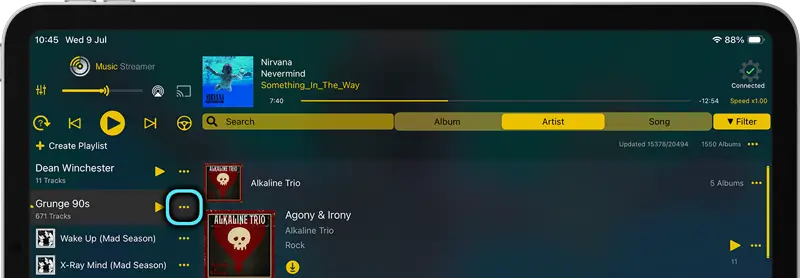
Download Entire Playlists
To download an entire playlist tap the actions menu icon to the right of the playlist and select "Download for Offline Playback".
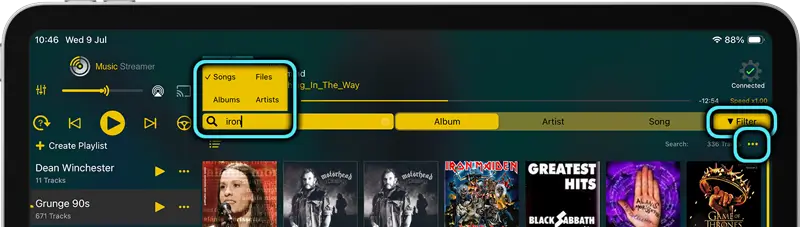
Download Search Results
Tap the search icon and choose whether to apply the search words to Songs, Files, Albums or Artists. In this example: search the Albums view for the word "Iron" and enable "Songs" on the options popup. There are quite a few results so filter it further by changing the genre filter to "Pop" only. Once you have the results you want, tap the actions menu and select "N matching tracks", then "Download for Offline Playback".
If you select "N Albums (n Tracks)" you will download all tracks for every album that has a song with "iron" in its title.
MusicStreamer's Offline Listening Mode
When you are away from your network and only the music that has been downloaded for offline playback is available, MusicStreamer's Offline Mode will display only those albums and songs, making it super easy to choose your next music.
To enable "Offline Mode" simply tap the cog icon in the top right of the screen and select "Offline Mode" you can then filter your library to only show the music you have downloaded to your iPhone.

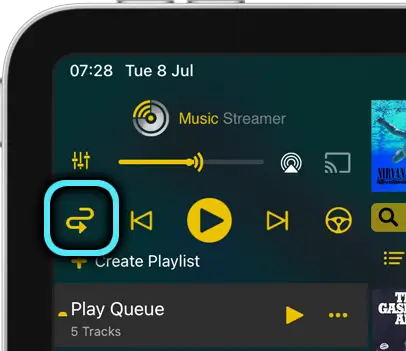
Endless Play Mode
Endless Play mode will add a random track from your music collection when the current track finishes playing. You can control the set of tracks to choose from by filtering your music via search keywords, Genre, or both. This feature is similar to Spotify's "Go to Song Radio" feature.

To switch to Endless Playback mode click the button to the left of the play controls until the following icon appears.
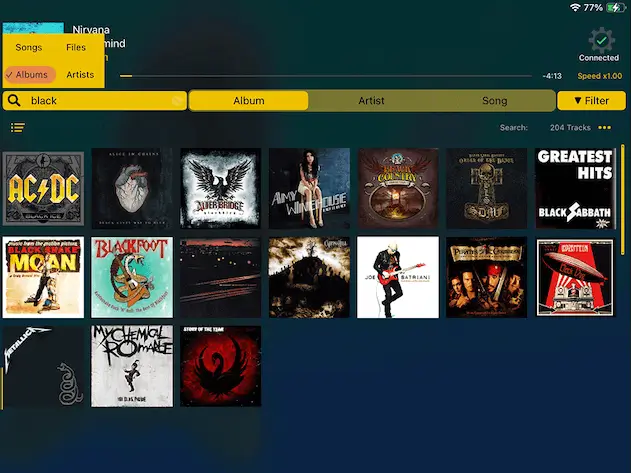
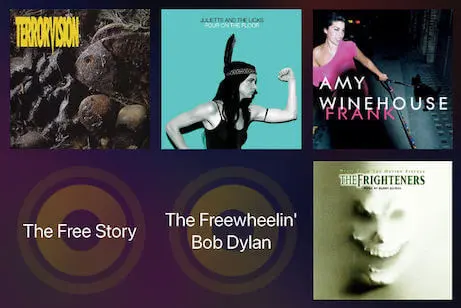
Use Search to Drive your Endless Playback
Search just Album names for a keyword, for example: "black". Endless Playback will use all the tracks in any Album with matching text "black".
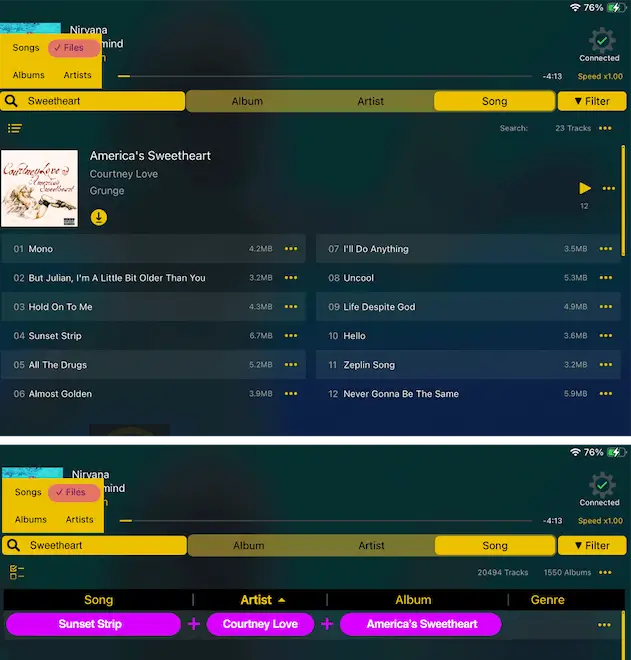
Search just Songs for a keyword, for example: "Sunset Strip". Endless Playback will use all the tracks from any Album that have a single match, in this case "sunset strip".
Search for an Artist by keyword, for example: "the lemonheads". Endless Playback will use all the tracks with a matching Artist name of "the lemonheads".
Your filenames contain the full path as text, for example "/Courtney Love/America's Sweeheart/Sunset Strip.mp3". This file would be found for searches with the following keywords:
- Love
- Sweetheart
- Sunset
In Endless Playback mode in Album or Artist view all tracks from this Album would be used.
In Song view only the matched Songs will play.
Endless Genre Playback
If you filter your music by Genre in Endless Playback mode only tracks from that Genre will be added to your Play Queue. This can be combined with search to filter it further.

Import and Export Playlists
You can easily import all your Apple Music/iTunes playlists or import and export individual playlists.
Import Multiple Music Playlists
Import All your Apple Music/iTunes Playlists into MusicStreamer
Easily import your iTunes Playlists from your computer to MusicStreamer on your iPad/iPhone:
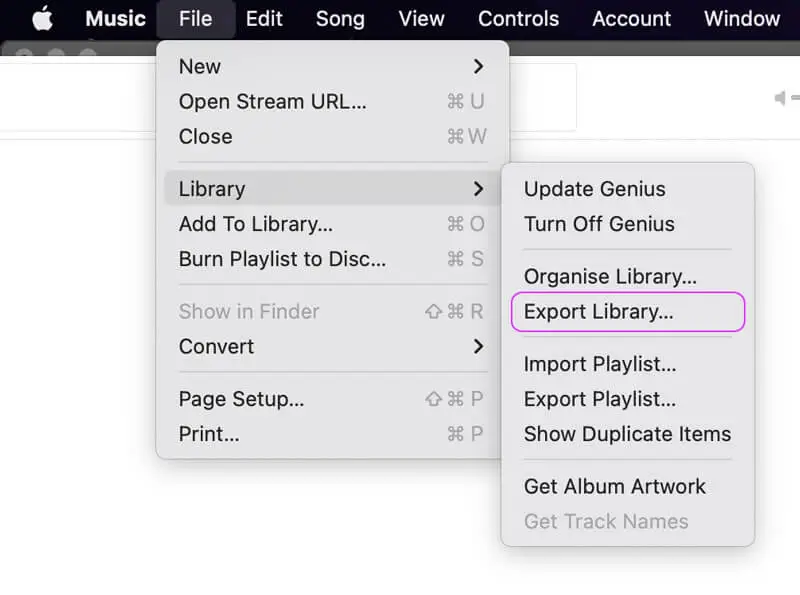
Step 1
- From the top menu in iTunes, select File -> Library -> Export Library
- Then save this .xml file, which is a list of all your music and all Playlists.
Step 2
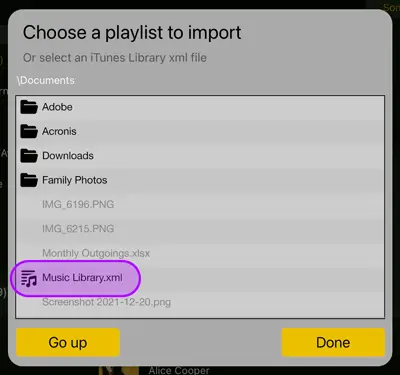
- In MusicStreamer tap the cog in the top right corner and select "Import Playlist"
- Navigate to your XML Library file and select it.
Step 3
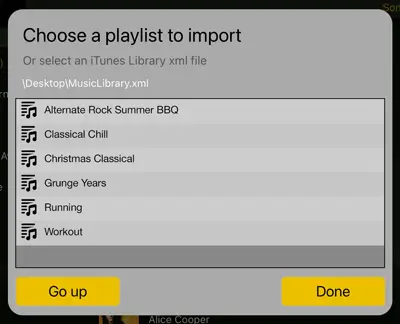
All your Playlists will now appear, select each Playlist you want to import and confirm each one by tapping "Create New". Once you are finished tap "Done".
Import a Music Playlist
Import a Single Playlist into MusicStreamer
Easily import a single Playlist file from Apple Music/iTunes into MusicStreamer with the following steps:
Step 1
On your compter:
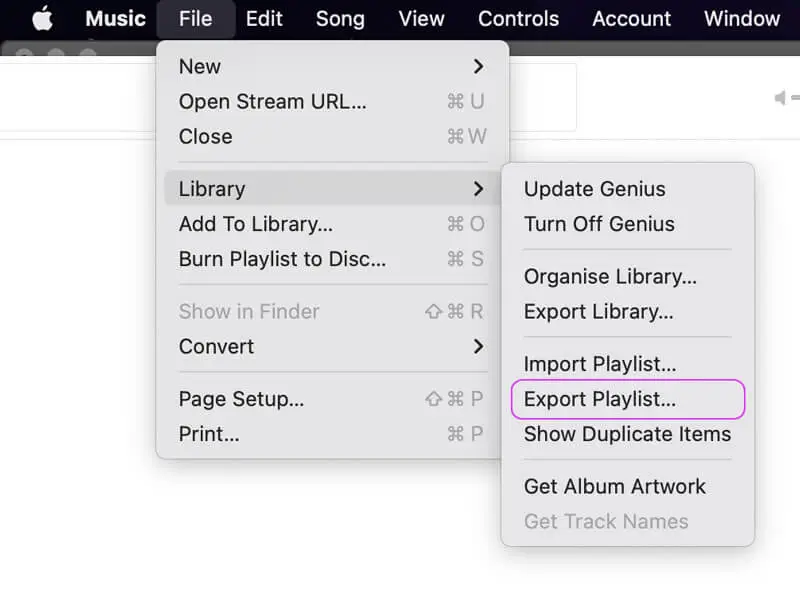
- Select your Playlist in iTunes
- Select File -> Library -> Export Playlist
- Then save this .m3u file, which is a list of your Playlist Songs and their location.
Step 2
In the MusicStreamer app:
- Tap the cog icon then select "Import Playlist".
- Navigate to the folder on your computer with your new .m3u or m3u8 playlist file and select it.
MusicStreamer will then check the Playlist, before asking you to confirm. When finished tap "Done".

Export your Playlists to use in iTunes
Create your Playlists in MusicStreamer and export them to use in Apple Music/iTunes.
Step 1
- In MusicStreamer tap the Playlist menu and select "Export for Mac" or "Export for PC".
- Below are a few different ways to share your Playlist back to your computer:
- The easiest method on Mac is to use AirDrop.
- eMail the playlist file to yourself to open on your compter.

Step 2
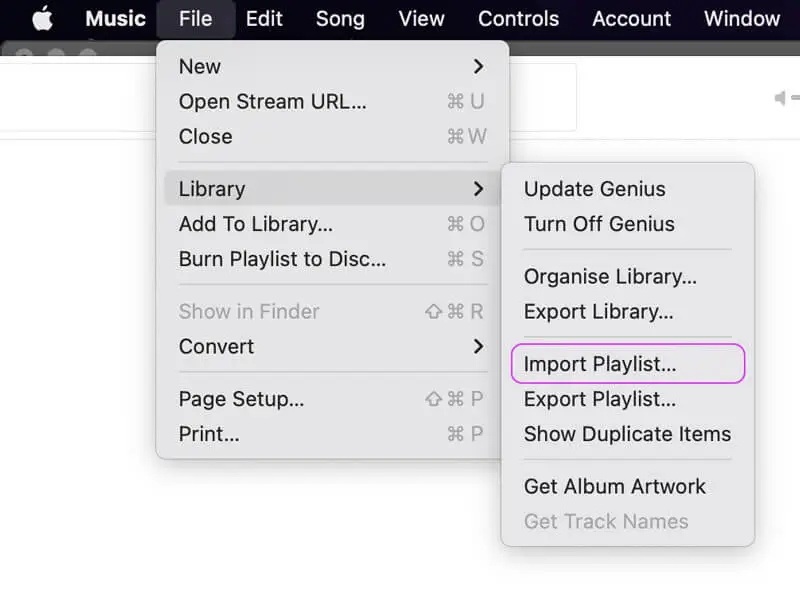
- In Apple Music/iTunes Import your new playlist file:
- File -> Library -> Import Playlist
- Select your file and continue.
Car Play
MusicStreamer has full CarPlay support. Plug in your iPhone and select the MusicStreamer app, then fill the play queue by selecting tracks or albums and enjoy downloaded music on your journey.
Note: In the MusicStreamer app, ensure you change to "Offline Mode". To do this, tap the cog icon and tap "Go Offline". Then choose YES to only display tracks that are available offline. You'll then see the available downloaded tracks for playback in the car, rather than your whole collection.
Connect to External Smart Devices
MusicStreamer can connect to smart devices via AirPlay, Chromecast and to Amazon Devices. Simply tap the AirPlay or Chromecast icon next to the Volume control and select your smart device. To connect to your Amazon device see our guide. Streaming your music to multiple Chromecast devices is easy with this tutorial.

Link Multiple Music Libraries
Add multiple music libraries to MusicStreamer and switch between them. Connect to your home music library, your friend's collection when at their home or a wireless network drive when in your car. Simply:
- Tap the cog icon top right
- Select "Music Sources"
- From here you can switch libraries
- Add new libraries
- Tap "Add Music Source"
- And follow the setup wizard
Missing Artwork?
MusicStreamer can discover artwork from a variety of places. If you have missing artwork, here are three ways to resolve this:
- Use a tag editor to add embedded artwork to your music files.
- Add a jpg or a png file into your album folder.
- Paste an image into MusicStreamer
- Tap the album action menu and select "Web Search" to open Safari and search for the album.
- In Safari tap and hold an album image and select "Copy".
- Return to MusicStreamer and use the Album action menu's "Paste Album Artwork".
Note: This option only stores it for the current music source. Use option 1 or 2 for a more permanent solution.
Then tap the cog icon, select "Rescan" and choose "Rescan everything" to find all your new artwork.
Light and Dark Mode
Easily change between light and dark modes:
- Tap the "Cog" icon
- Select "Preferences"
- Scroll to the bottom of the dialog and select "Light Mode".
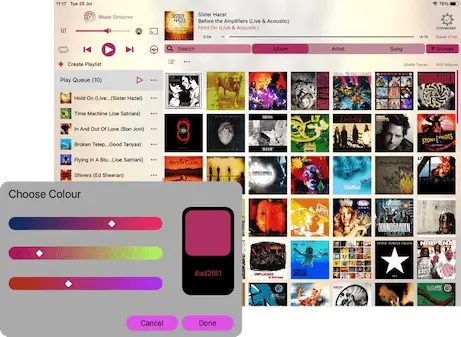
Personalize the Look of MusicStreamer
On the "Preferences" dialog scroll to the bottom and select either one of the 4 preset UI Colour options or tap "Custom" and choose your own accent colour to be used throughout the app.
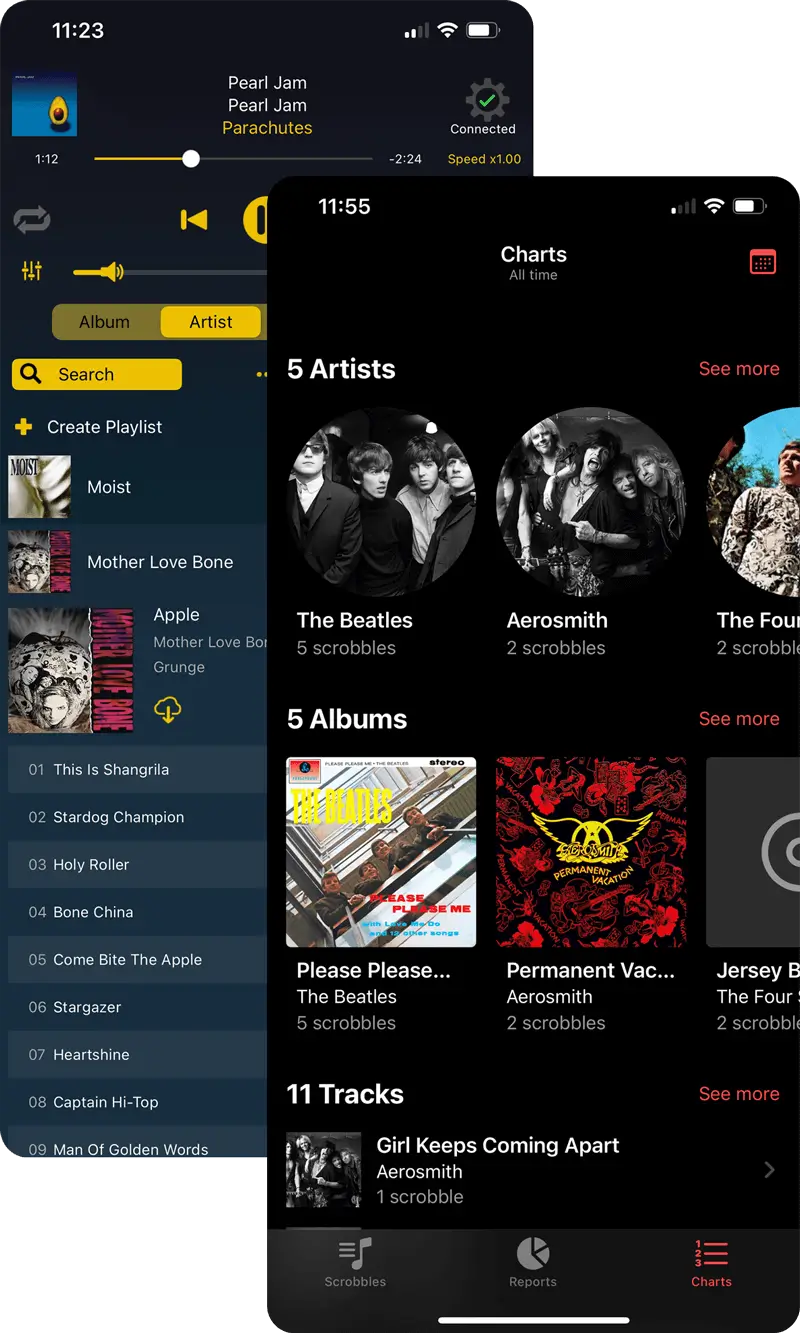
Scrobble Tracks to Last.fm
Automatically update your last.fm profile with the music you’ve been playing in MusicStreamer. View your listening history on last.fm and share it with friends.
Tap the cog icon and select "Preferences", then enter your last.fm username and password.

Connect to macOS
Use the setup wizard in MusicStreamer. If you have any problems see the guides below:
Enable File Sharing on macOS
macOS File Sharing may not be enabled, especially if you don't have other computers on your network or this is the first time you have tried to access shared folders over your network.
Use the following steps to enable File Sharing on macOS.
How to Share a Folder
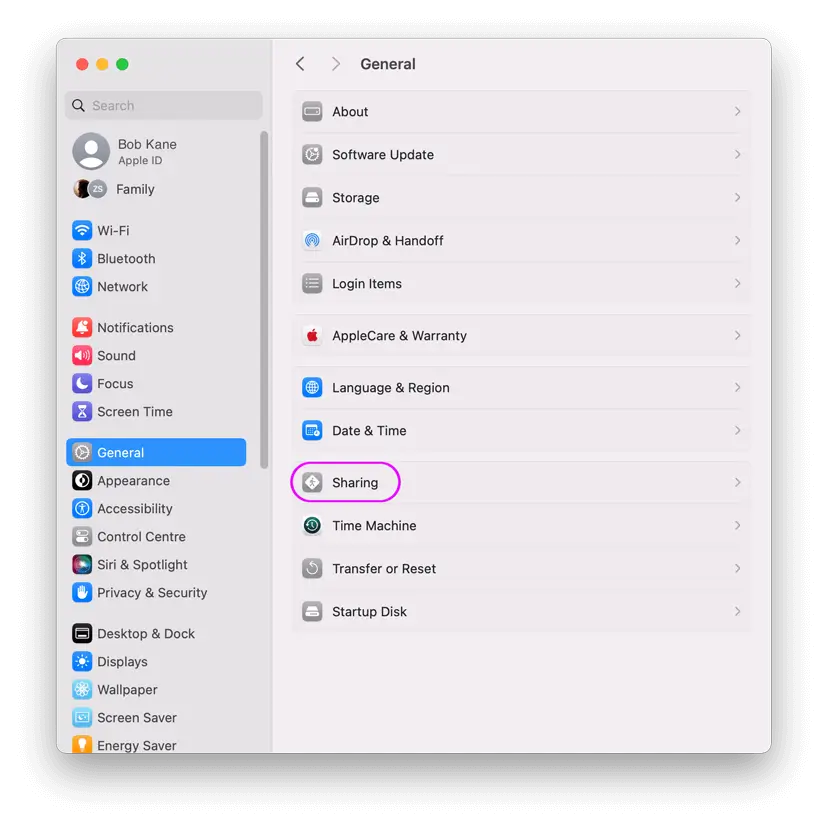
Step 1
- Open the 'System Settings' app on your Mac.
- Select 'General' in the left hand pane.
- Select 'Sharing'.
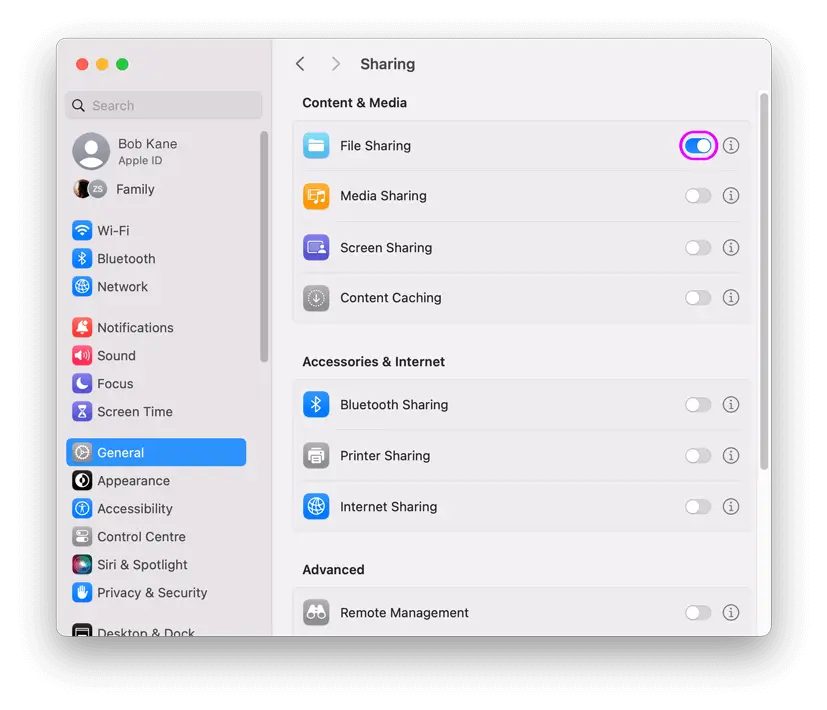
Step 2
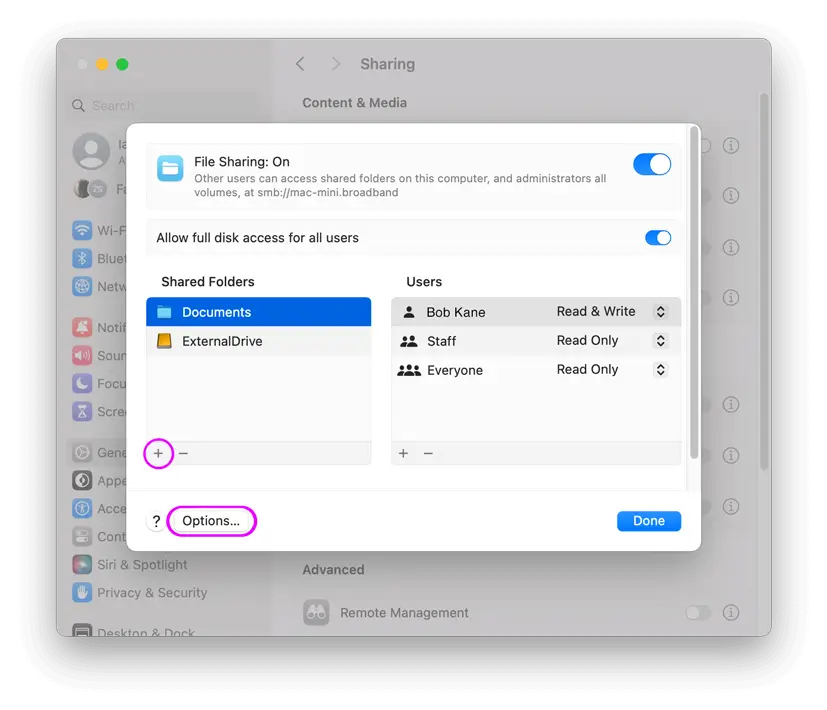
Switch on 'File Sharing', and then click on the 'i' to the right of the 'File Sharing' switch.
Step 3
- Under the 'Shared Folders' list, click +
- Choose your music folder to share and click 'Add'
- Click the "Options" button.
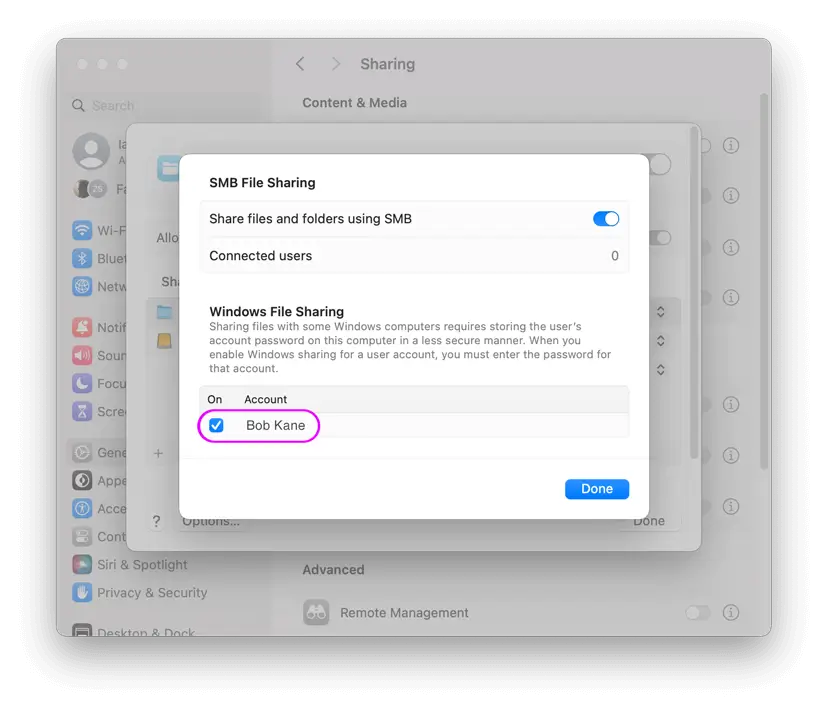
Step 4
Ensure that your user is ticked.
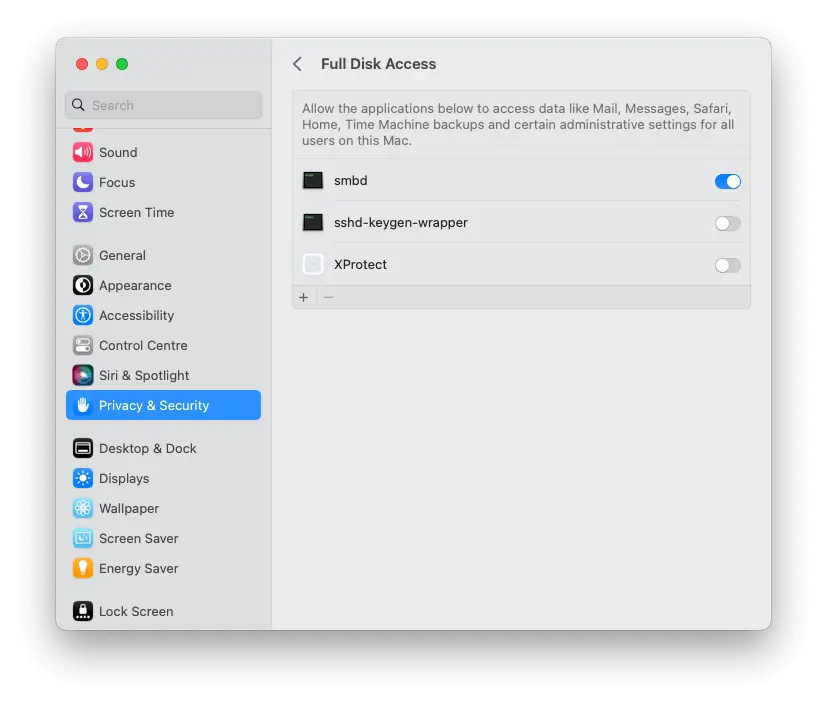
Step 5
Then close this window, select "Privacy & Security” from the System Settings left hand pane and click on “Full Disk Access”.
Switch on ’smbd’.
Do a network scan in MusicStreamer again. Come right back if your Mac isn't found automatically.
How to Configure macOS Firewall
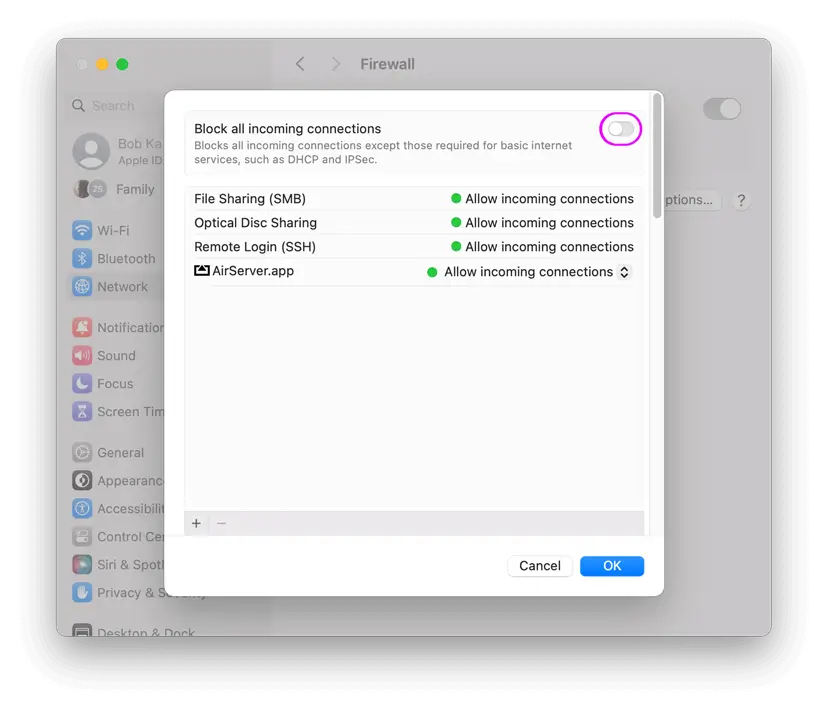
You should now be able to connect MusicStreamer to your Mac. If you can't then the macOS firewall may be blocking the network.
Use the following steps to navigate to the firewall control screen.
- Bring up System Settings.
- Click "Network" in the left hand pane.
- Click "Firewall".
- Then click the "Options" button.
- Ensure that "Block all incoming connections" is switched off.
If the scan didn't find your Mac try adding it manually
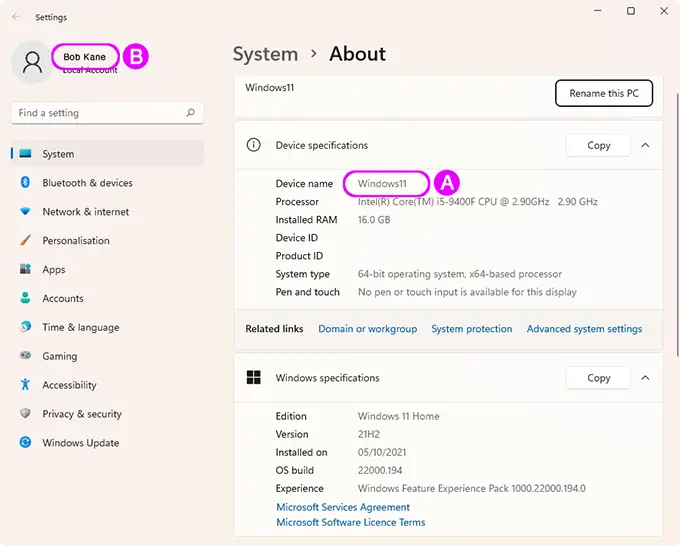
- Tap the 'Manual Setup' icon that appears after you have started a scan.
- Enter your machine name (shown in the screenshot above labelled 'A') or IP address (shown in the screenshot above labelled 'B') and tap 'OK'.
- Enter your username and password used to access your Mac. The username is your logon username for your Mac (shown above in the screenshot above labelled 'C').
- Choose your music directory. By default MusicStreamer will locate your iTunes Music folder. If your music is stored elsewhere on your drive simply locate it and tap 'Done'.
And that's it.
If you still can't connect please email us at support@stratospherix.com
Connect to Windows 11
Use the setup wizard in MusicStreamer. If you have any problems see the guides below:
Enable File Sharing on Windows 11
Windows 11 File Sharing may not be enabled, especially if you don't have other computers on your network or this is the first time you have tried to access shared folders over your network.
Use the following steps to enable File Sharing on Windows 11.
Step 1
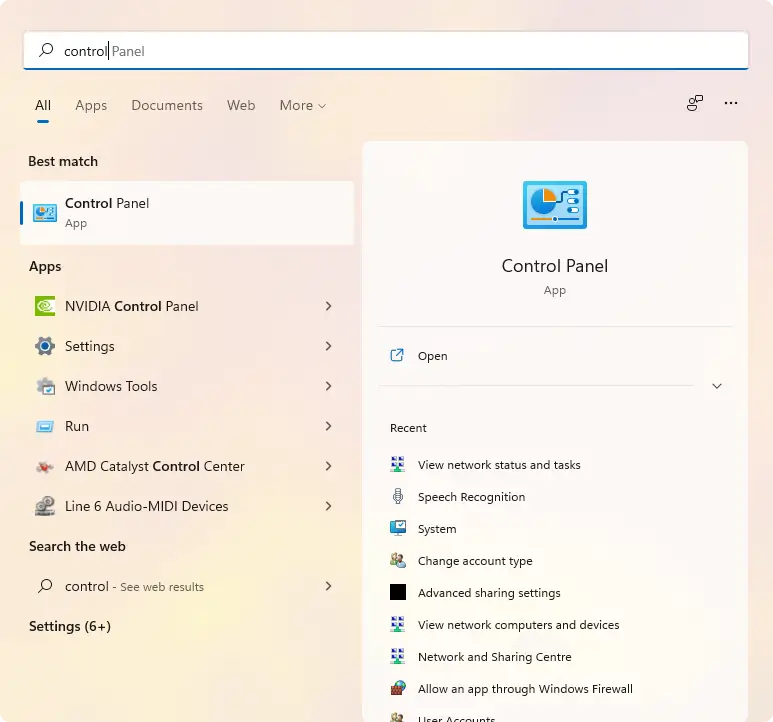
Press the Windows key and type "control panel". Select the Control Panel App from the listing.
Step 2
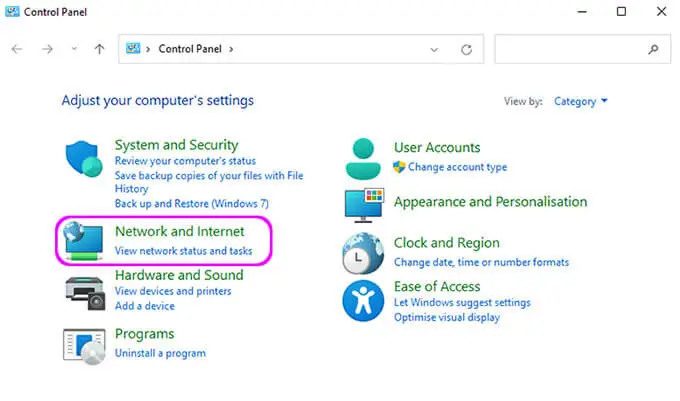
Click "Network and Internet"
Step 3
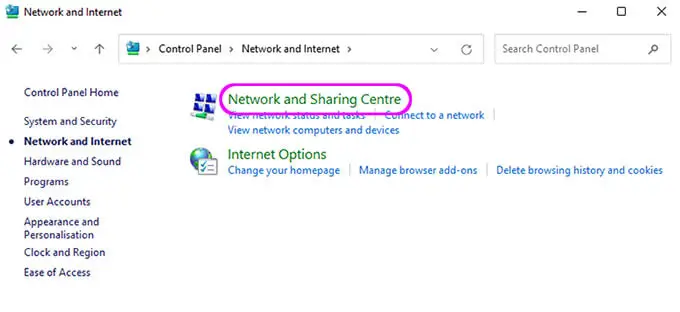
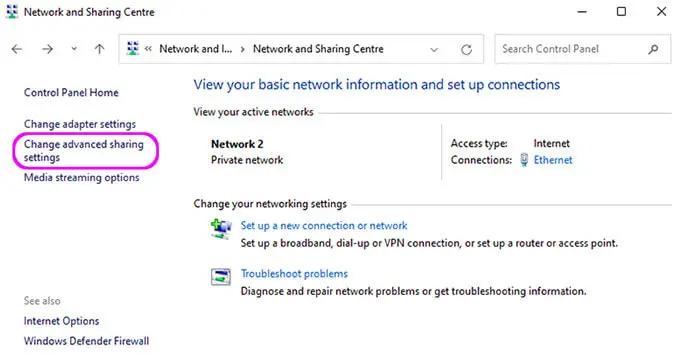
Click the "Network and Sharing Centre" header in this dialog.
Step 4
Click "Change advanced settings" in the left hand side.
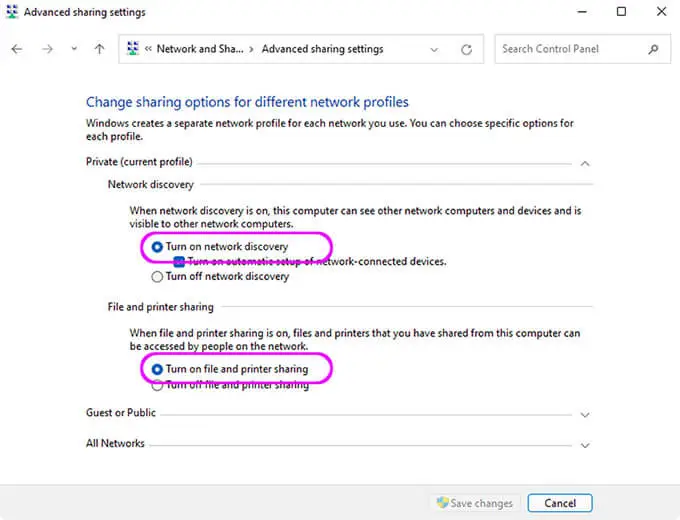
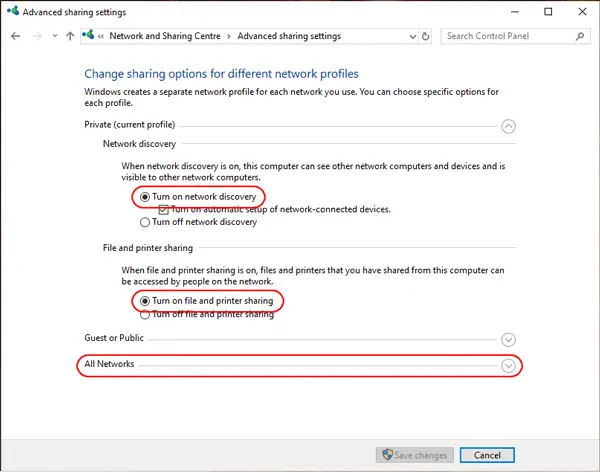
Step 5
Under the "Private (Current Profile)" section:
Enable "Turn on network discovery".
Enable "Turn on file and printer sharing".
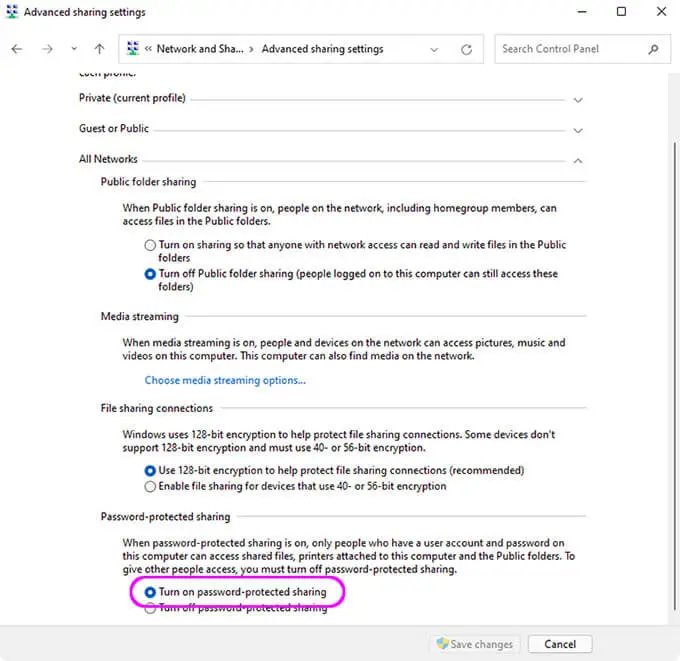
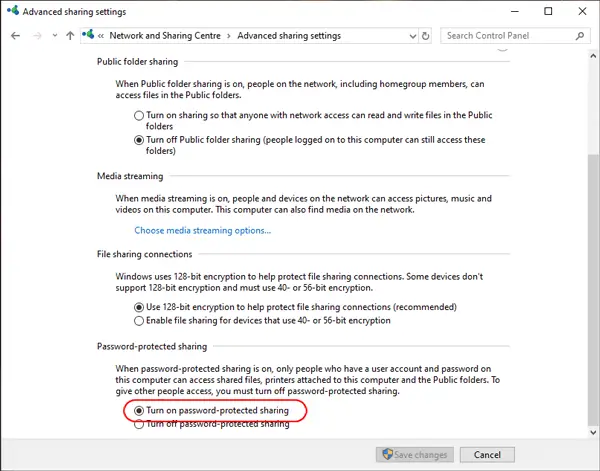
Step 6
Expand the "All Networks" section. Enable "Turn on password protected sharing".
We recommend using password protected sharing, but if you want people with no username or password to be able to access your files (only those files marked for 'Everyone' access), then set password protected sharing to "off".
Share your Music Folder in Windows 11
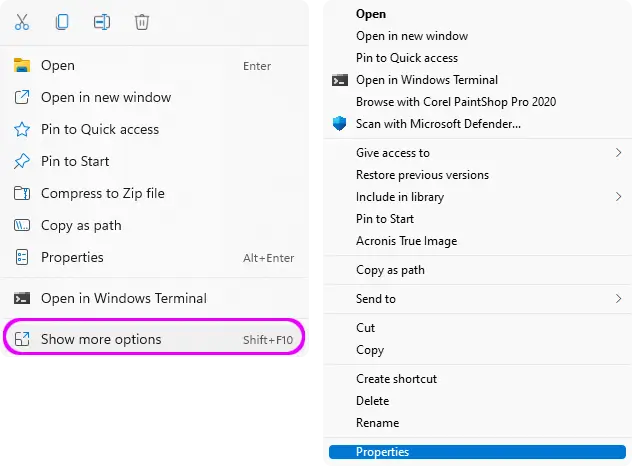
-
In Windows File Explorer, find your music folder. This folder may be called "My Music" or "iTunes Music". Right-click it and choose "Show more options" then select "Properties".
-
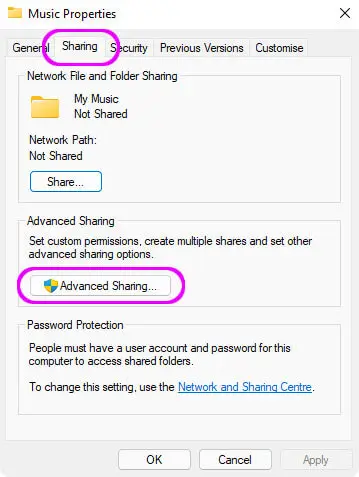
In the Folder Properties dialog select the "Sharing" tab.
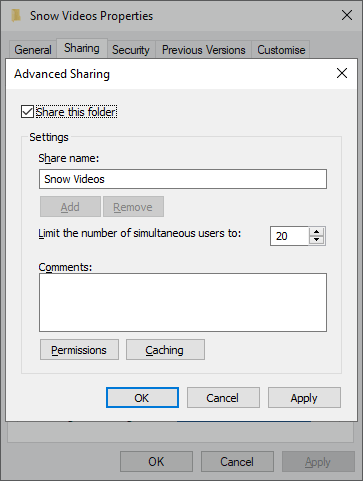
Click the "Advanced Sharing..." button.
-
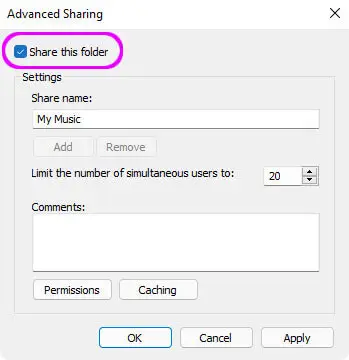
Tick "Share this folder"
-
Enter a Share Name that this folder will be known by on the network.
By default, the folder will be shared for read-only access for the user who creates the share.If you wish to change this security, click the "Permissions" button and choose the level of access that you require.
The following dialog should appear.
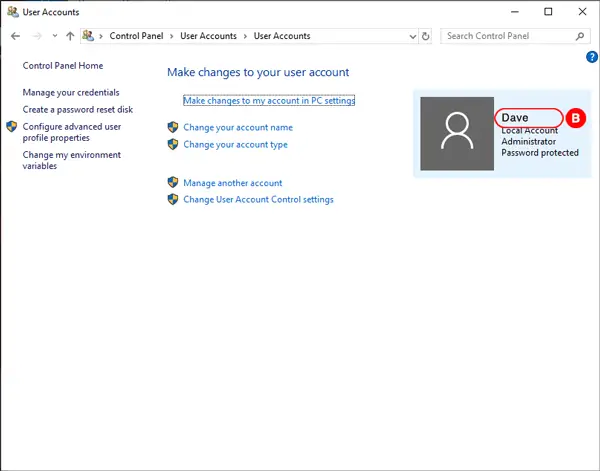
Find your Username
- Launch "Control Panel" (To start Control Panel on Windows 11, at the tiles screen type 'Control Panel'.)
- Click "User Accounts". Now click "User Accounts"
- The user account you are currently accessing is highlighted on the right. When MusicStreamer prompts for a login, you will use this name.
- If the account you have chosen does not say "Password protected" under it, then it has no password. You need to click the "Create a password" option. Having a password will mean that you will need to enter it each time you boot your Windows PC.
- You will enter this password into MusicStreamer (but be careful when typing it because it is case-sensitive).
Now close this help and try a scan. Come right back if your PC isn't found automatically.
If the scan didn't Find your Windows PC try adding it manually
- Open MusicStreamer on your iPad/iphone.
- Tap the 'Manual Setup' icon that appears after you have started a scan.
- Enter your machine name (shown in the screenshot below labelled 'A') or IP address and tap 'OK'.
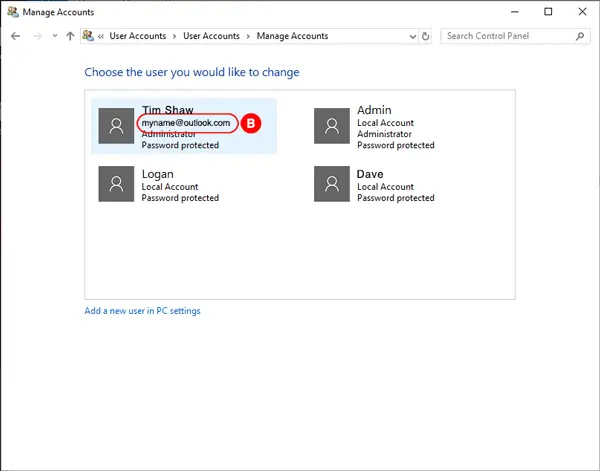
- Enter your username and password used to access your PC. The username is your logon username for your PC (shown above in the screenshot labelled 'B').
- Choose your music directory. By default MusicStreamer will locate your My Music folder. If your music is stored elsewhere on your drive simply locate it and tap 'Done'.
Find your Windows Computer's Network Name
- On Windows 11, press the windows key and type 'computer name' and press return.
- You should now have a window that looks like the following.
- The text ringed and marked A is your computer name.
- This will be the text to enter in Music Streamer's "Address" setting.
And that's it.
If you still can't connect please email us at support@stratospherix.com
Connect to Windows 10
How to Scan your MP3 Music Collection on Windows 10 from your iPad/iPhone
Enable File Sharing on Windows 10
Windows 10 File Sharing may not be enabled, especially if you don't have other computers on your network or this is the first time you have tried to access shared folders over your network.
Use the following steps to enable File Sharing on Windows 10.
Step 1
- Launch Control Panel (To start Control Panel on Windows 10, at the tiles screen type "Control Panel".), under "Network and Internet" click "View network status and tasks".
- On the left hand side, click the link "Change advanced sharing settings".
- Select "Turn on network discovery".
- Select "Turn on file and printer sharing".
Step 2
- Expand the "All Networks" section and scroll to the bottom, then enable "Turn on password-protected sharing".
We recommend using password protected sharing, but if you want people with no username or password to be able to access your files (only those files marked for 'Everyone' access), then set password protected sharing to "off". - Click "Save changes".
How to Share your Music Folder
- This folder may be called 'My Music' or 'iTunes Music'. In Windows Explorer (on the Windows 10 Desktop or type "File Explorer" at the tiles screen ), right-click the music folder and choose "Properties"
- In the Properties window select the "Sharing" tab.
Click the "Advanced Sharing..." button.
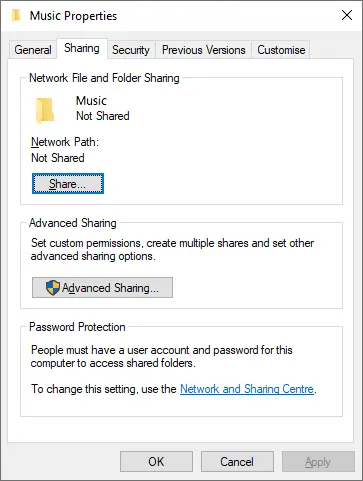
This window should now appear.
Tick "Share this folder" and then click OK.
Find your Username
- Launch "Control Panel" (To start Control Panel on Windows 10, at the tiles screen type "Control Panel".)
- Click "User Accounts". Now click "User Accounts"
- The user account you are currently accessing is highlighted on the right. When MusicStreamer prompts for a login, you will use this name.
- If the account you have chosen does not say "Password protected" under it, then it has no password. You need to click the "Create a password" option. Having a password will mean that you will need to enter it each time you boot your Windows PC.
- You will enter this password into MusicStreamer (but be careful when typing it because it is case-sensitive).
Now close this help and try a scan. Come right back if your PC isn't found automatically.
If the scan hasn't worked try adding it manually
- Tap the "Manual Setup" icon that appears after you have started a scan.
- Enter your machine name (shown in the screenshot below labelled 'A') or IP address and tap 'OK'.
- Enter the username and password used to access your PC. The username is your logon username for your PC (shown above in the screenshot labelled 'B').
- Choose your music directory. By default MusicStreamer will locate your My Music folder. If your music is stored elsewhere on your drive simply locate it and tap 'Done'.
Find the Computer's Network Name
- Launch Windows Explorer. (To start Explorer on Windows 8, at the tiles screen type 'File Explorer'.)
- In the left-hand pane, find the "Computer" or "This PC" node.
- Right-click it and choose "Properties".
- The text ringed in red is your computer name.
- This will be the text to enter in Music Streamer's "Address" setting.
And that's it.
If you still can't connect please email us at support@stratospherix.com

Play Music from a Connected USB Flash Drive
Connect a USB drive loaded up with your music library files and let MusicStreamer scan your music collection and play it all.
Step 1
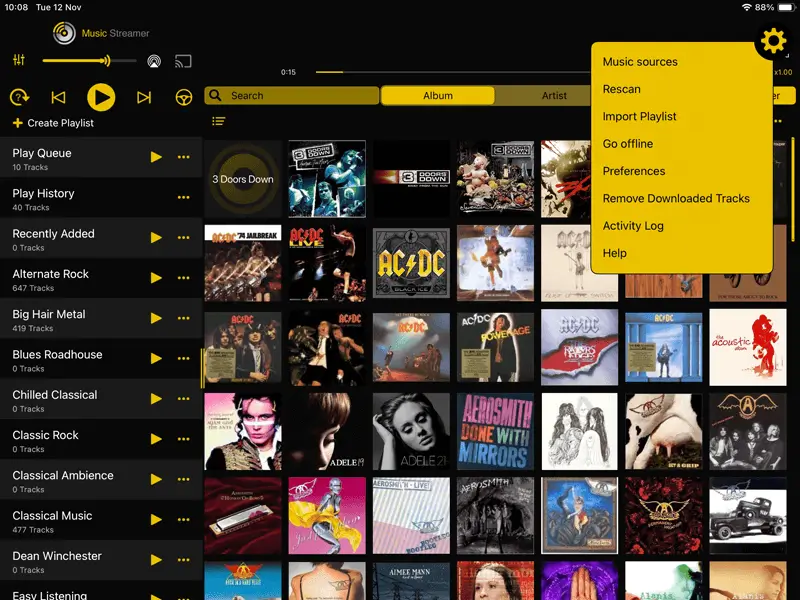
In MusicStreamer tap the Cog icon in the top right corner and select "Music Sources".
Then tap "Add Music Source".
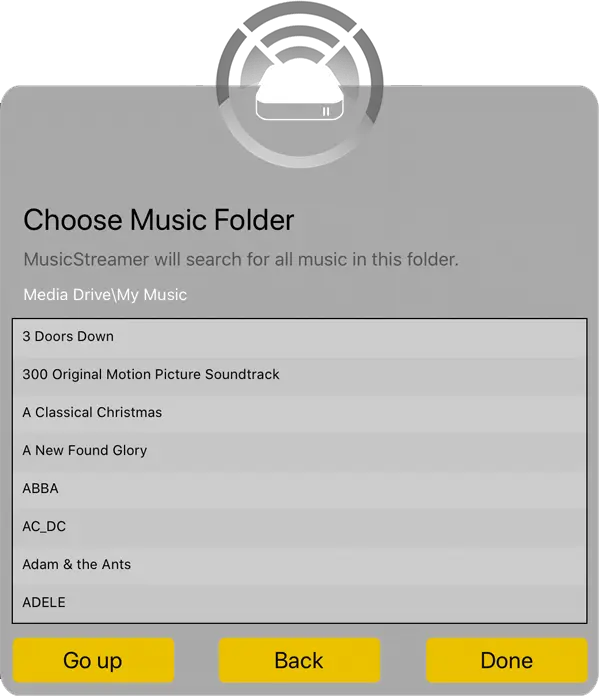
Then select "Choose Music Folder".
Step 2
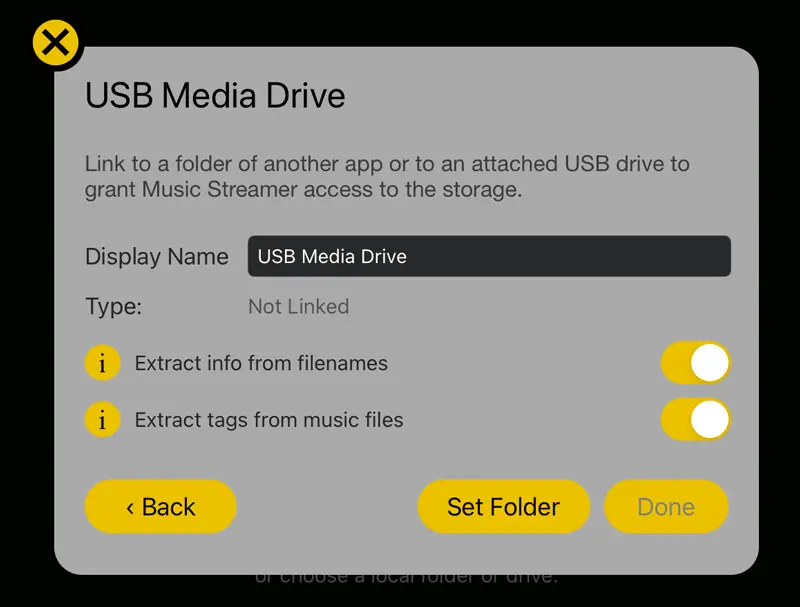
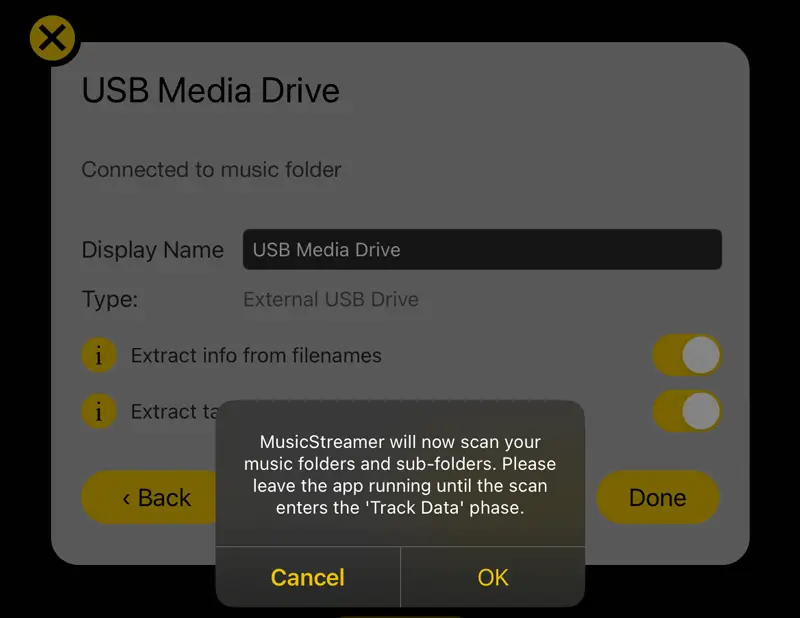
Give your new music source a name in the "Display Name" input.
Then tap "Set Folder".
Step 3
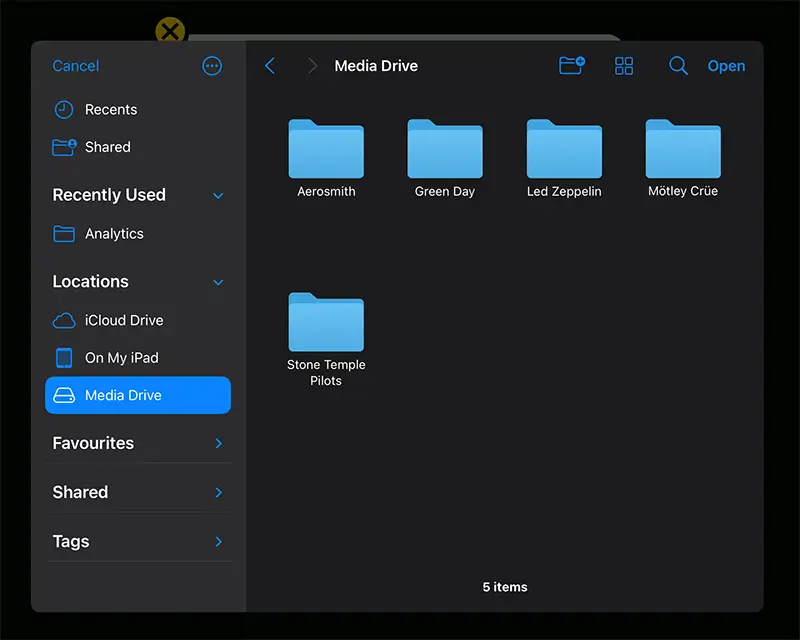
In the files selector popup, select your USB Drive in the left hand pane.
Browse to where your music folder is stored and tap "Open".
Works with: Flash Drives, USB Drives, USB Sticks and SSD Drives. You may need a USB C to USB A adapter or similar for your drive depending on your iOS device.
Step 4
Back in MusicStreamer tap "Done" then confirm the popup.
MusicStreamer will now scan your music collection.
Play Music from your iCloud Drive
Upload your music to your iCloud storage and play your entire music collection from anywhere with your iPhone / iPad. You can even import your existing playlists.
Step 1
In MusicStreamer tap the Cog icon in the top right corner and select "Music Sources".
Then tap "Add Music Source".
Then select "Choose Music Folder".
Step 2
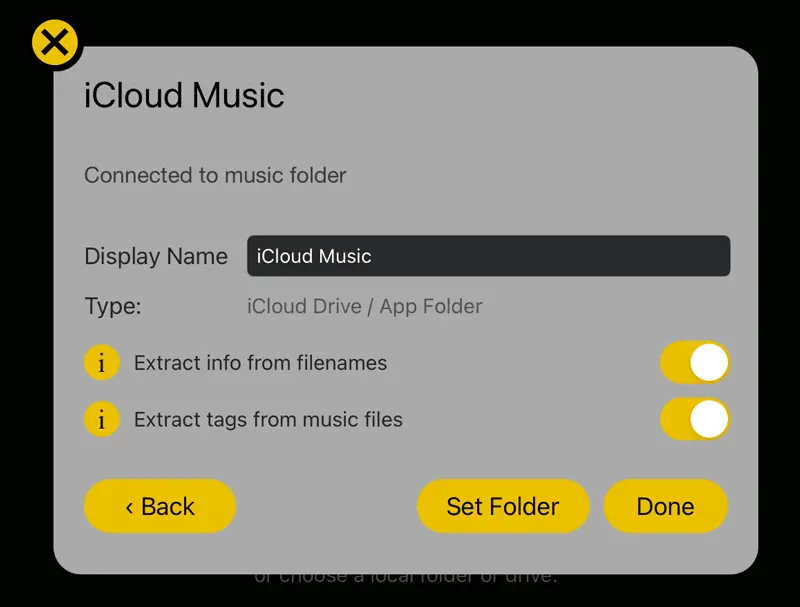
Give your new music source a name in the "Display Name" input.
Then tap "Set Folder".
Step 3
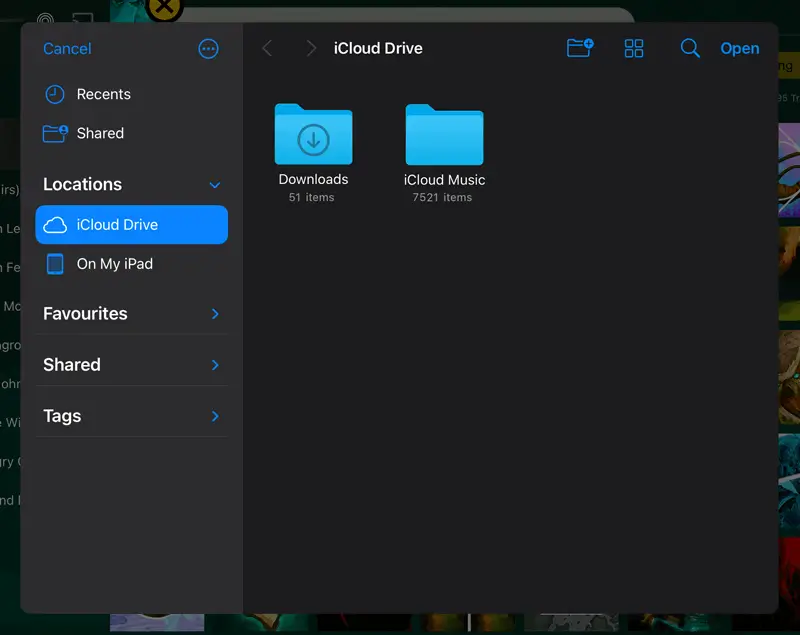
In the files selector popup, select your "iCloud Drive" location in the left hand pane.
Browse to where your music folder is stored and tap "Open".
Step 4
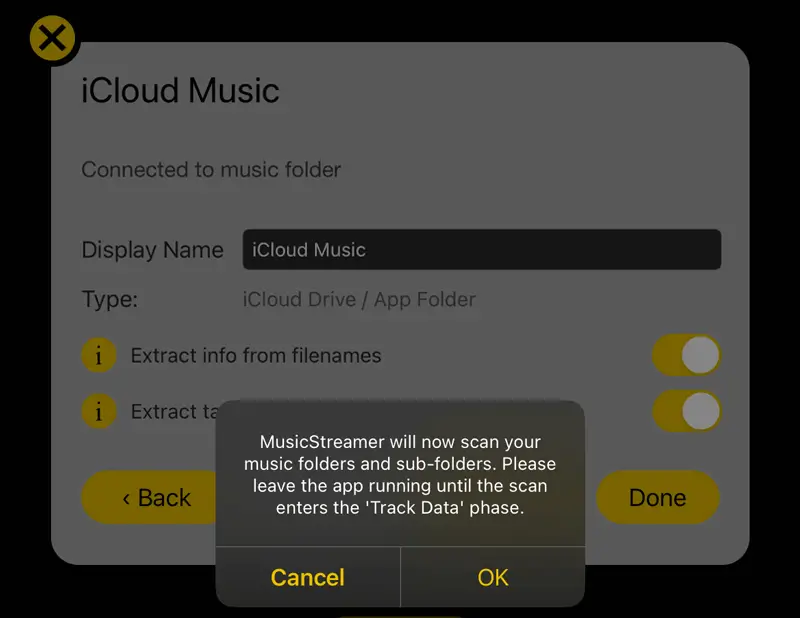
Back in MusicStreamer tap "Done" and then confirm the popup.
MusicStreamer will now scan your music collection.
Play Music from your TimeCapsule
Enable File Sharing
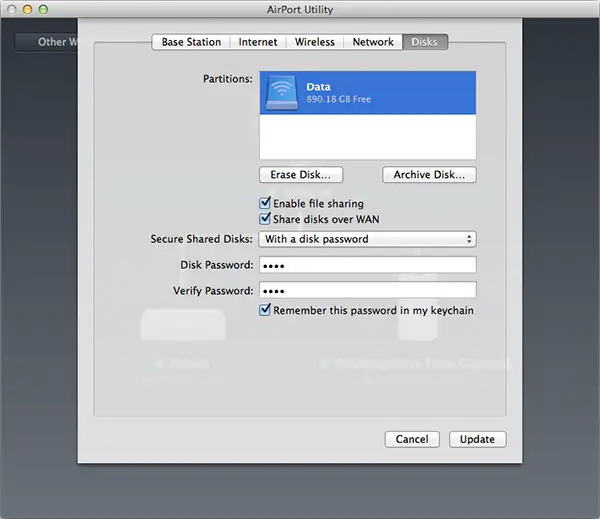
Run the AirPort Utility app.
- Select the "Disks" tab at the top of the utility.
- Ensure that "Enable file sharing" is ticked.
- Choose from the "Secure Shared Disks" drop down list. MusicStreamer supports all three modes.
- If you choose the "With accounts" option, the username you configure here is the same one you will need to enter into MusicStreamer's Username field.
- For the other two options, you can leave MusicStreamer's Username field blank and just enter the password.
And that's it.
If you still can't connect please email us at support@stratospherix.com
Free Trial

Download Now
