- File Selection Mode
- Selecting Images in the Image Viewer
- Copying Files
- Drag and Drop
- AirDrop Files
- Share Files
- eMail Files
- Bulk Rename - Add text to filenames
- Bulk Rename - Find and Replace
- Bulk Rename - Add Indexes / Counter
- Bulk Rename - Rename with Dates
- Bulk Rename - Rename using EXIF Data
- Rotate Images
- Convert Images
- Create Contact Sheets
- Rate Photos with XMP
- Remove GPS from Photos
- Edit IPTC Properties on Photos
- Slideshows
- Create Custom Tasks
- Monitor a Folder for a Keyword and Download Hourly
- Download PDFs from the Last 7 Days
- Trim PDF Pages
- Change IPTC Properties on Images in Bulk
- Rotate Images in Bulk
- Automated Backup of Video Files from a Chosen Folder
- Automate Backup and Deletion of Files Older than a Chosen Date
- Remove GPS from Multiple Photos
- Convert Images in Bulk
Converting Images in FileBrowser Pro for Mac
This guide explains how to convert images in FileBrowser Pro for Mac, including converting individual files or multiple images in bulk to formats such as JPG, PNG, HEIC and TIFF.
How to convert an image
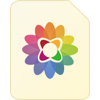
To convert an image, right click it and choose "Convert". This option is also available on the image viewer menu if you open the image first.
Convert your image to one of the following formats:
- JPG
- HEIC
- TIFF
Clicking the required format will create a copy of the file in the same folder.
Note: Images in the Photo Library need to be copied elsewhere before they can be converted.
Custom Tasks - Convert Images in Bulk
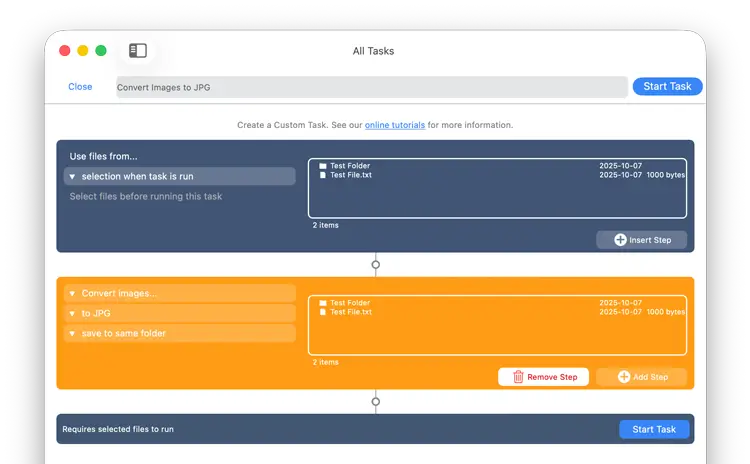
To convert multiple images you need to create a Custom Task. Follow our simple steps below to create a task that you can re-use easily on any photo selections.
- From FIleBrowser for Mac's Home Screen, click the "All Tasks" locations and click the "+" icon in the bottom toolbar and select "Create Custom Task".
- Give your new Custom task a name like "Convert to JPG"
- Click the "Insert Step" button
- Change this to new section to "Convert Images..." and change the second dropdown to the format you want your images converted to.
- Set whether you want them saved to the same folder or not.
- Once done click "Close".
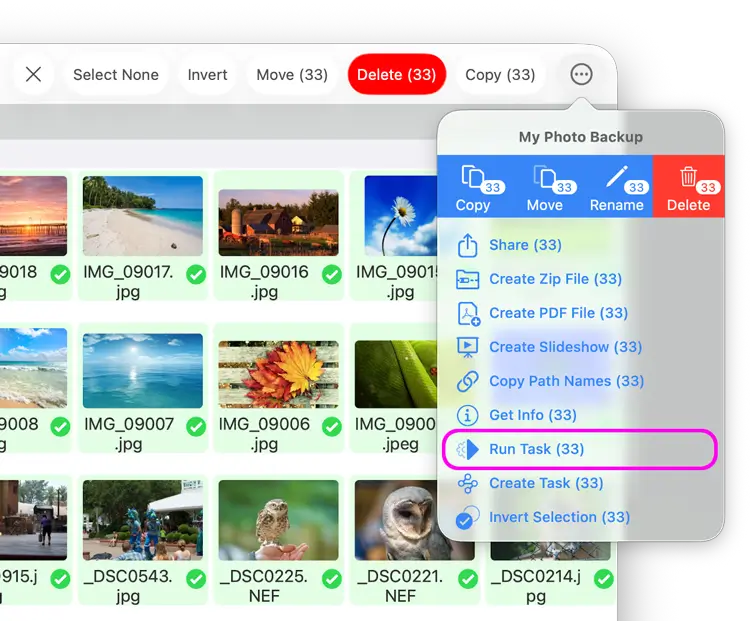
Return to your folder with your photos in:
- Click "Select" then select all the photos you want to convert.
- Click the 3 dots Context menu and select "Run Task".
- A menu will appear showing you all your Custom tasks, select the new "Convert to JPG" task you just created.
- This will show you a summary of changes, click "Start Now".
Your custom task has been saved so you can re-use this on any photos you select in future.